The University of Maine Cooperative Extension has many fine programs around gardening that are well worth the time spent to attend.* Having recently gone to their workshop on raising garlic, I’d like to share a few tips I picked up. Growing garlic is easy, but there are a few things to know.
There are two types of garlic, soft neck and hard neck. Soft neck varieties grow in warmer climates and are what we normally find at the supermarket- not a good choice for us as we prefer the hundred-mile diet concept. Hard neck varieties thrive in our colder Maine climate.
The hard neck types produce both flowers and scapes. Scapes are long curly ends that form at the top of the plants. The scapes need to be cut off as they appear, usually sometime around June. This allows the plant's energy to focus on bulb growth instead of seed pods. The scapes are edible and can be a spicy addition to stir fries or salads.
Now, in mid-October is the time to plant garlic. The hard neck varieties require a 40 degree temperature for a couple of months. Planting now should result in a July crop.
Before planting it’s a good idea to do a soil check. Garlic loves good, composted soil with a ph between 6 & 7. A simple do-it-yourself soil test kit can evaluate your ph, although we prefer to send a sample to the Maine Soil Testing laboratory. This costs $15 and we get a lot of information besides the ph, such as the nutrient levels in the soil.
We have chosen to plant the variety, German Extra Hardy this year, and have prepared a raised bed for them. We had already mixed in some organic cow manure a couple of weeks ago, and now, on the day of planting are adding a layer of compost.
After you take apart the heads of garlic into the individual cloves, just stick them into the dirt with the root end (it’s the larger end) downwards. Make sure there is 2” of soil over them. If the cloves are planted too shallow, the garlic will freeze. If planted too deep the cloves will split and grow multiple tops. Plant the cloves about 6 inches apart.
After the ground freezes, cover the soil with about 6” of mulch. There are a number of options for mulch. We have plenty of deciduous trees so we'll rake some leaves onto the bed. In spring, when the tops begin to appear we'll remove some of the mulch. Don't remove it all or the tender white tops will be exposed to the sun.
It’s time to harvest garlic when the first few leaves start to yellow, and before the bulbs begin to separate. Allow the garlic to air dry in the shade- if you put them in the sun they can get scalded. Inside a shed or garage is usually a good place. When the stalks are dry, braid them or trim off the stalks and put the cloves in a mesh bag.
The final step is to use your home grown garlic in your favorite recipe. Bon appetite! G.H.
*University of Maine Cooperative Extension: http://extension.umaine.edu/
Friday, October 22, 2010
Sunday, October 17, 2010
Saffron (Crocus Sativus)
Paella is a favorite dish for us. We ordered it at a restaurant in France, and it was so memorable a meal -paella and red wine makes an entire dinner- that we had to learn how to make it. And so it has become one of Gil’s specialties.
Buying that one key ingredient, saffron, however, which turns the rice yellow and gives the dish its characteristic flavor, is a mega expensive spice. It is said to be THE most expensive of spices. But, to do your paella right, it’s a must-have.
The good news is that many of us can grow it. It thrives in zones 5 to 9. Saffron comes from a small autumn-blooming, purple-flowered crocus, called Crocus Sativus. There are other fall-blooming crocus, so be sure to get the correct variety. We ordered bulbs from a supplier in Wisconsin* and planted a small patch of it a year ago. This year we are getting one flower per plant. The flower yield is supposed to improve over the years until the plants produce as many as six flowers each.
Planting them is as simple as any bulb. This would be a great rock garden plant, or for the front of a perennial bed where you can keep track of what and where they are. To start a patch, prepare a bed with rich, sandy, well-drained soil. Plant the bulbs several inches deep and placed about 3” apart. All summer your crocus plot will look entirely bare. Seed a summer annual there that can be taken out when the crocus come up. In October, popping out of the ground will be a small clump of spiky dark green leaves for each plant, and the flowers will be soon to follow.

To harvest the saffron, pick the long red things. They are the stigmas and can be plucked out in a clump of three. Dry them on a paper towel in a dark dry place, like inside a kitchen cupboard. After three or so days they will appear dry. Pack them into an airtight container and keep the container out of light.
The stigmas should be soaked for a couple of hours before using. An alternative method is to roast them- heat the stigmas carefully in a dry heavy pan, then use the back of a spoon or a mortar and pestle to grind them into powder. The flavor is released by cooking saffron in liquid making it a perfect spice for things like paella. Only a very small amount is needed in cooking.
This really touches my “frugal” button. It’s great to find that this incredibly expensive little spice will grow here, and that it is completely simple to grow and to harvest. The flowers are pretty and paella is now affordable... ah-h-h-h, yes... -jmm
*McClure & Zimmerman, 335 S. High St., Randalph, WI 53956
Sunday, October 3, 2010
Making Sauerkraut
Sally Fallon in her book, Nourishing Traditions*, gives some excellent background as to why unpasteurized, brined foods are an important part of a diet. We highly recommend this book as a great source of info on healthy eating. In short, brining makes foods easier to digest, at the same time adding valuable enzymes that are required for a healthy digestive system. Homemade sauerkraut is far better than storebought, and easy to make.
We bought a crock** for the purpose- a specialty item that has a water seal. It came with a pair of weights so we don’t need to use stones. Sauerkraut can be made just as well in canning jars if you don’t have a crock. Last year we had too much to fit in the crock so we did some in jars. It all came out the same.
You will need canning jars or crock, a scale, a mechanism for making thin slices (ours is a well-sharpened chef’s knife with a cutting board), bowls or kettles for holding sliced cabbage, a tablespoon measure, and something to pound the sauerkraut with (we used a potato masher and Gil is thinking of rigging up a sawed-off baseball bat for next year- this being his first year of doing this). The only food ingredients are cabbage and salt. We had bought two 5-pound organically grown cabbages at Common Ground Fair and combined these with some red cabbage from the garden, totaling about 12 pounds of cabbage for this batch.
We use 1 tbsp of salt to one pound of cabbage. You might want to search around and see what other recipes are out there, to have something to compare to. I don’t remember where we came up with these numbers, but it worked out well last year, so we’re doing it again this year.

 |
| Slicing the cabbage- the bowl holds a measured amount of sliced cabbage and the kettle on the scale is being filled. |
 |
| Gil is still pounding away. |
 |
| Here he's using his fist to push hard. This is also an acceptable method. |
 |
| Here we are looking down into the crock. Gil has worked hard and you can see the moisture forming. |
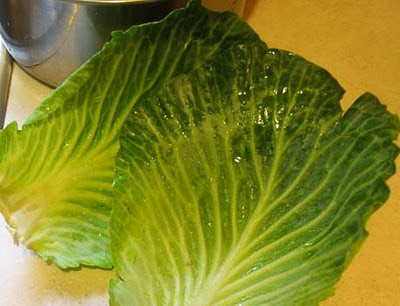 |
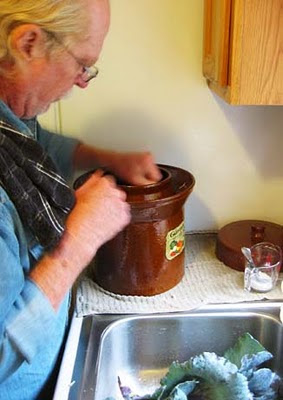
| These leaves will cover the sauerkraut. When all the cabbage is in and pounded and there is plenty of moisture, the leaves are placed evenly over the top. This keeps small bits of cabbage from coming to the surface |
 |
| Voila! We did it! Marsha sliced and Gil pounded and we now have a crock of sauerkraut. |
The shapes inside the crock are the weights that came with it. About an inch of water must be covering the weights. If the cabbage didn’t produce enough moisture, then boil some salted water, let it cool and add to the crock.
Cover the crock. If you have one like ours put some water in the moat-like area that the lid sits into.
If you are using canning jars leave an inch or more of space at the top and seal tightly. I did not use weights nor did I top the cabbbage with a leaf. Fermentation creates a layer of gas above the sauerkraut, preserving it. Moisture may bubble out of the jar as fermentation begins- that is ok, keep the jar sealed and place in cool storage after a few days.
The next step is to leave the crock sit in the kitchen for two to three days. If you shift the lid slightly and some bubbles come out with a big “glub” sound, this means it is fermenting. Haul the crock down to the root cellar for cool storage. It will continue to ferment, although more slowly. Keep the crock closed and in cool storage for about 4 to 6 weeks (some people insist on waiting for 6 months but we’d find that awfully hard to do).
To remove sauerkraut from the crock, take off the lid and set it aside upside down on a clean surface (I use a clean towel). Carefully take off the weights and set them into the lid. Carefully pull aside the leaves. Use a tongs to dig out as much as you will use in about a week, placing it into a clean container. Put the leaves back into place, put the weights back in, and check that there is enough moisture to cover them. Replace the lid and check that there is enough water in the moat (if your crock has one).
Heat the sauerkraut very slowly on very low heat to barely warm it through. Do not boil or cook it or the good enzymes will be lost. Some recipes will say to put it through a canning process, but, again, why destroy those good enzymes? -jmm
*Sally Fallon. Nourishing Traditions: The Cookbook the Challenges Politically Correct Nutrition and the Diet Dictocrats, Revised Second Edition. 2001, New Trends, Publishing, Inc.
**Harsch Stoneware Fermentation Crock
Subscribe to:
Posts (Atom)