WELCOME TO OUR BLOG

JOIN US AS WE SHARE THE EXPERIENCES AND RECIPES OF OUR ALL-SEASON ORGANIC GARDENING ADVENTURES AND OTHER RELATED STUFF AS WE DIG, WEED, HARVEST, AND COOK OUR WAY THROUGH EACH GLORIOUS GARDEN YEAR!

Wednesday, December 29, 2010

Our Hundred Mile Winter Diet

The hundred mile diet, as Barbara Kingsolver eloquently wrote about in her book, “Animal, Vegetable, Miracle,”  involves eating foods that are grown within a hundred miles from home. Growing your own veggies or buying them from local farmer's markets, raising chickens for meat and eggs, or getting fruits, raw milk and organic meats from local orchards and farms are ways to live the hundred mile diet.
Eating local vegetables is easy during summer as we harvest from our gardens and visit farmer’s markets. But it’s January and here in Maine the gardening season is long gone. So, what is the answer to eating local vegetables? 
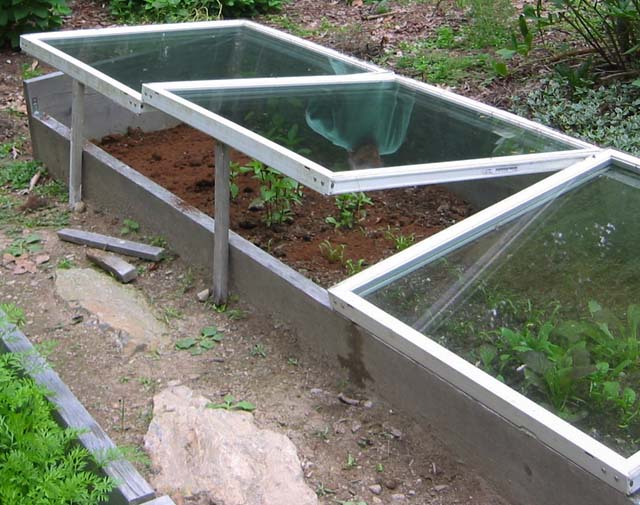
Well, we’re doing it and here’s how. Our cold frames are filled with fresh greens. Hardy plants such as spinach, arugula, mache, claytonia and some lettuce varieties are beautiful and thriving even though the ground is frozen and there’s a foot of fresh snow everywhere else. We’ve talked a lot about cold frames (see previous postings) and right now is when we appreciate them most. Those fresh greens become salads and side dishes full of color, nutrients, and flavor.
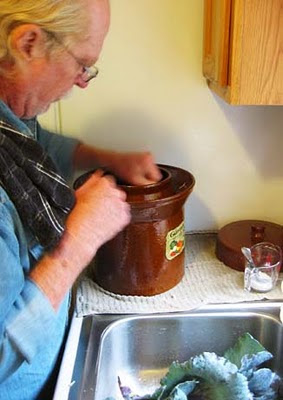
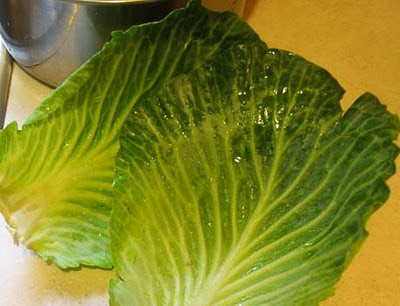
Winter squash did very well in the recent growing season, and we put away several dozen delicata, acorn and butternut. Brined cabbage fills the sauerkraut crock, and we have jars of brined cucumber pickles. Cucumbers, zucchini, plums, and tomatoes in various relishes and chutneys are in jars in the root cellar. In the freezer are green beans, beets, swiss chard, collard greens, red mustard leaves, and basil. We have jars of dried pinto and kidney beans. Kale remains in the garden, we push the snow aside to pick some. Kale is sweet this time of year, its starches having gone to sugar with the chilly weather. 
Our other needs are supplied locally. The freezer is filled with organic grass-fed beef from farmer Mike in Lyman (a couple towns over) who does his best to get us our quarter every year. From him, too, we get raw milk, raw butter, and chicken. Apples are still available from a nearby orchard. Fish, lobster, and clams harvested off the coast of Maine are another important part of our diet, available year round. 
The hundred mile diet is not a new health food fad. It goes as far back as people have settled on the land and had to survive using the resources around them. Our great-grandparents (your great-great grandparents if you are younger than us) lived this way. And it can still be done. Barbara Kingsolver’s family made a commitment to a solid year of eating locally. Refer to the book for their experiences. And ... consider trying the idea for yourself (hey, it’s working for us...)! -G.H.

Monday, November 22, 2010

The Keyhole Garden

The Permaculture Series - exploring the concepts of sustainability: gardening that takes care of itself with less work and better productivity, one topic at at time.

One of permaculture’s many ideas is the “keyhole” garden, referring to the shape of it. One could instead call it “U” or horseshoe-shaped. A keyhole garden consists of a central pathway surrounded on three sides by garden beds. The shape is intended to maximize growing area while minimizing pathways.

We decided to try this idea. Our chosen space is about a 13 x 14 foot rectangle. We first took out some surfacing tree roots, and the movable rocks. The rocks are now a small stone wall behind the area, building up the back of it that had been a downhill slope. This leveled the area and will help to keep rainwater there. Rain is our source of water for this. It is out of reach of the hose. And, too, another concept of permaculture (there are many!) is of finding ways to retain and use rainwater, and we'll get to that in a future post.

After preparing the space we then figured out on which side the path should enter and how wide to make the path (wide enough, we decided, to turn a wheelbarrow around). The next step was to create garden-able soil by layering compostable materials. Our other garden areas were also started with compost instead of digging. The materials are built upward from ground level instead of digging downward (there’s too many rocks here to dig). This works beautifully- our plants have done very well in it.

We began with forest land for our keyhole garden, but if you have lawn instead, the same idea works just as well. We’re giving the layering process below in case you’d like to try it too.

We're not sure yet exactly what we want to plant. We want to try some of the plants touted by permaculturalists. These include Good King Henry, fennel, perennial kale, seakale, and other edible perennials. We'll think about this through the winter as we go through seed and plant catalogs. The "perma" part of permaculture means permanent, indicating the use of perennial or reseeding annuals that are hardy in our climate.

Here is how to assemble the layers, and I should say there’s no need to be a perfectionist about it. If you’re starting with lawn, cut the grass as short as you can get it.

1. Spread any soil amendments that are needed to improve your garden soil. Here, we need lime to convert forestland, and we like to add alfalfa pellets (this is sold as bunny food at the farm supply).

2. Top the amendments with a sprinkling of manure.

3. Next is a crucial layer: newspapers and/or cardboard. Use the black and white newspaper pages, not the shiny ads. Layer them 1 - 2” thick and overlap the edges. If you are shading out lawn be sure to make the layer thick to prevent any sunlight getting through. This layer and the ones beneath it will attract worms which will eat through the papers and cardboard. Worm manure is excellent for your plants.

4. Now add about a foot of mulch material. This is an important layer that will break down into a hefty amount of compost. We are using pine boughs from some pine trees we just had taken down, and some raked leaves. Scrounge for what you need for this layer- trimmings from shrubbery, grass clippings, raked leaves and so on, or go to the farm supply and get bales of straw (not hay which can reseed the area with grass).

5. Top it off with a layer of compost. You can sprinkle on some dirt also if you have some handy.

The layers will break down into compost. The keyhole garden will not require tilling or digging. The ground beneath the layers will loosen and become enriched by compost and worm activity (if you have sod it will rot and loosen up). Although we are told you can go ahead and put plants into this right away (plant them with compost surrounding the roots), we prefer to let ours age over the winter. In spring we’ll let you know what we’ve decided to plant in it. -jmm

Saturday, November 13, 2010

Greens for Winter Harvest

Earlier we posted instructions for building and preparing cold frames. This post will focus on the plants that we will be harvesting this winter. Our cold frames consist of eleven windows this year and planting took place between late August and late September. Between November and March there is little actual growth that takes place. It's starting to get cold enough at night now to be putting the windows down on the cold frames. This is a sign that growth is slowing for the season.

Spinach happily thriving in the cold frame in November
Under some of the windows are carrots, beet greens, and scallions that will over-winter and be ready in early spring. Between the rows of carrots, mache is already being picked for salads. Mache is the hardiest of greens and is one of our favorites. It is a small, low-growing plant that easily reseeds itself if you allow it to flower and go to seed. You may find that it has planted itself in the pathway outside of the cold frame.
We plant spinach also, and several varieties of lettuce. Black Seeded Simpson is a favorite lettuce because it is very prolific. The current crop will take us into January when the cold frame will be reseeded for a March crop. 
We also plant arugula, endive, escarole, Swiss chard, sorrel, and claytonia. Endive, escarole, and radicchio are members of the chicory family, with radicchio being an Italian red chicory. Arugula and sorrel add distinct flavors (sorrel is lemony) and are wonderful in a mesclum mix. Claytonia, also called “Miner’s lettuce,” sprouts small white flowers in the spring which we eat with the leaves. Spinach, beet greens, and Swiss chard should not be eaten raw on a regular basis, so we steam them for a side dish.    
We use succession planting for some of the crops. Mache, lettuce and spinach are planted in two week intervals so new crops become harvestable in late fall, the middle of winter and in early spring. 
These plants are our personal produce selection that keeps us from having to buy Peruvian produce at the super market. With a goal of eating locally, even in our Maine winter months, cold frames are how to eat from the garden year round. Bon appetite. -G.H. 

Friday, October 22, 2010

A Few Tips from the Garlic Workshop

The University of Maine Cooperative Extension has many fine programs around gardening that are well worth the time spent to attend.* Having recently gone to their workshop on raising garlic, I’d like to share a few tips I picked up. Growing garlic is easy, but there are a few things to know.

There are two types of garlic, soft neck and hard neck. Soft neck varieties grow in warmer climates and are what we normally find at the supermarket- not a good choice for us as we prefer the hundred-mile diet concept. Hard neck varieties thrive in our colder Maine climate. 

The hard neck types produce both flowers and scapes. Scapes are long curly ends that form at the top of the plants. The scapes need to be cut off as they appear, usually sometime around June. This allows the plant's energy to focus on bulb growth instead of seed pods. The scapes are edible and can be a spicy addition to stir fries or salads.

Now, in mid-October is the time to plant garlic. The hard neck varieties require a 40 degree temperature for a couple of months.
Planting now should result in a July crop.

Before planting it’s a good idea to do a soil check. Garlic loves good, composted soil with a ph between 6 & 7. A simple do-it-yourself soil test kit can evaluate your ph, although we prefer to send a sample to the Maine Soil Testing laboratory. This costs $15 and we get a lot of information besides the ph, such as the nutrient levels in the soil.
 
We have chosen to plant the variety, German Extra Hardy this year, and have prepared a raised bed for them. We had already mixed in some organic cow manure a couple of weeks ago, and now, on the day of planting are adding a layer of compost.

After you take apart the heads of garlic into the individual cloves, just stick them into the dirt with the root end (it’s the larger end) downwards. Make sure there is 2” of soil over them. If the cloves are planted too shallow, the garlic will freeze. If planted too deep the cloves will split and grow multiple tops. Plant the cloves about 6 inches apart.

After the ground freezes, cover the soil with about 6” of mulch. There are a number of options for mulch. We have plenty of deciduous trees so we'll rake some leaves onto the bed. In spring, when the tops begin to appear we'll remove some of the mulch. Don't remove it all or the tender white tops will be exposed to the sun.

It’s time to harvest garlic when the first few leaves start to yellow, and before the bulbs begin to separate. Allow the garlic to air dry in the shade- if you put them in the sun they can get scalded. Inside a shed or garage is usually a good place. When the stalks are dry, braid them or trim off the stalks and put the cloves in a mesh bag.

The final step is to use your home grown garlic in your favorite recipe. Bon appetite! G.H.

*University of Maine Cooperative Extension: http://extension.umaine.edu/

Sunday, October 17, 2010

Saffron (Crocus Sativus)

Paella is a favorite dish for us. We ordered it at a restaurant in France, and it was so memorable a meal -paella and red wine makes an entire dinner- that we had to learn how to make it. And so it has become one of Gil’s specialties.

Buying that one key ingredient, saffron, however, which turns the rice yellow and gives the dish its characteristic flavor, is a mega expensive spice. It is said to be THE most expensive of spices. But, to do your paella right, it’s a must-have.

The good news is that many of us can grow it. It thrives in zones 5 to 9. Saffron comes from a small autumn-blooming, purple-flowered crocus, called Crocus Sativus. There are other fall-blooming crocus, so be sure to get the correct variety. We ordered bulbs from a supplier in Wisconsin* and planted a small patch of it a year ago. This year we are getting one flower per plant. The flower yield is supposed to improve over the years until the plants produce as many as six flowers each.

Planting them is as simple as any bulb. This would be a great rock garden plant, or for the front of a perennial bed where you can keep track of what and where they are. To start a patch, prepare a bed with rich, sandy, well-drained soil. Plant the bulbs several inches deep and placed about 3” apart. All summer your crocus plot will look entirely bare. Seed a summer annual there that can be taken out when the crocus come up. In October, popping out of the ground will be a small clump of spiky dark green leaves for each plant, and the flowers will be soon to follow.


To harvest the saffron, pick the long red things. They are the stigmas and can be plucked out in a clump of three. Dry them on a paper towel in a dark dry place, like inside a kitchen cupboard. After three or so days they will appear dry. Pack them into an airtight container and keep the container out of light.

The stigmas should be soaked for a couple of hours before using. An alternative method is to roast them- heat the stigmas carefully in a dry heavy pan, then use the back of a spoon or a mortar and pestle to grind them into powder. The flavor is released by cooking saffron in liquid making it a perfect spice for things like paella. Only a very small amount is needed in cooking.

This really touches my “frugal” button. It’s great to find that this incredibly expensive little spice will grow here, and that it is completely simple to grow and to harvest. The flowers are pretty and paella is now affordable... ah-h-h-h, yes... -jmm

*McClure & Zimmerman, 335 S. High St., Randalph, WI 53956

Sunday, October 3, 2010

Making Sauerkraut


Sally Fallon in her book, Nourishing Traditions*, gives some excellent background as to why unpasteurized, brined foods are an important part of a diet. We highly recommend this book as a great source of info on healthy eating. In short, brining makes foods easier to digest, at the same time adding valuable enzymes that are required for a healthy digestive system. Homemade sauerkraut is far better than storebought, and easy to make.

We bought a crock** for the purpose- a specialty item that has a water seal. It came with a pair of weights so we don’t need to use stones. Sauerkraut can be made just as well in canning jars if you don’t have a crock. Last year we had too much to fit in the crock so we did some in jars. It all came out the same.

You will need canning jars or crock, a scale, a mechanism for making thin slices (ours is a well-sharpened chef’s knife with a cutting board), bowls or kettles for holding sliced cabbage, a tablespoon measure, and something to pound the sauerkraut with (we used a potato masher and Gil is thinking of rigging up a sawed-off baseball bat for next year- this being his first year of doing this). The only food ingredients are cabbage and salt. We had bought two 5-pound organically grown cabbages at Common Ground Fair and combined these with some red cabbage from the garden, totaling about 12 pounds of cabbage for this batch.
   
We use 1 tbsp of salt to one pound of cabbage. You might want to search around and see what other recipes are out there, to have something to compare to. I don’t remember where we came up with these numbers, but it worked out well last year, so we’re doing it again this year. 

 Wash the cabbage, removing the outer leaves. Set aside two of the largest leaves to cover the sauerkraut with later. Other outer leaves if they are useable can be thinly sliced and used. Chunk up the cabbage- this five-pounder is cut into quarters. A kettle is on the scale and the scale is set to zero.

Slicing the cabbage- the bowl holds a measured amount of sliced cabbage and the kettle on the scale is being filled.
A layer of cabbage has been placed into the crock. A layer can be a couple inches thick and must be adequately pounded before adding more. Here is Gil thunking the sliced cabbage with a potato masher. The salt has been measured and he will add some with each layer. The salt draws the moisture out of the cabbage. When moisture appears, another layer of sliced cabbage can be added.

Gil is still pounding away.
Here he's using his fist to push hard. This is also an acceptable method.
Here we are looking down into the crock. Gil has worked hard and you can see the moisture forming.
These leaves will cover the sauerkraut. When all the cabbage is in and pounded and there is plenty of moisture, the leaves are placed evenly over the top. This keeps small bits of cabbage from coming to the surface
 
Voila! We did it! Marsha sliced and Gil pounded and we now have a crock of sauerkraut.

The shapes inside the crock are the weights that came with it. About an inch of water must be covering the weights. If the cabbage didn’t produce enough moisture, then boil some salted water, let it cool and add to the crock.

Cover the crock. If you have one like ours put some water in the moat-like area that the lid sits into.

If you are using canning jars leave an inch or more of space at the top and seal tightly. I did not use weights nor did I top the cabbbage with a leaf. Fermentation creates a layer of gas above the sauerkraut, preserving it. Moisture may bubble out of the jar as fermentation begins- that is ok, keep the jar sealed and place in cool storage after a few days.

The next step is to leave the crock sit in the kitchen for two to three days. If you shift the lid slightly and some bubbles come out with a big “glub” sound, this means it is fermenting. Haul the crock down to the root cellar for cool storage. It will continue to ferment, although more slowly. Keep the crock closed and in cool storage for about 4 to 6 weeks (some people insist on waiting for 6 months but we’d find that awfully hard to do).

To remove sauerkraut from the crock, take off the lid and set it aside upside down on a clean surface (I use a clean towel). Carefully take off the weights and set them into the lid. Carefully pull aside the leaves. Use a tongs to dig out as much as you will use in about a week, placing it into a clean container. Put the leaves back into place, put the weights back in, and check that there is enough moisture to cover them. Replace the lid and check that there is enough water in the moat (if your crock has one).

Heat the sauerkraut very slowly on very low heat to barely warm it through. Do not boil or cook it or the good enzymes will be lost. Some recipes will say to put it through a canning process, but, again, why destroy those good enzymes? -jmm

*Sally Fallon. Nourishing Traditions: The Cookbook the Challenges Politically Correct Nutrition and the Diet Dictocrats, Revised Second Edition. 2001, New Trends, Publishing, Inc.  

**Harsch Stoneware Fermentation Crock        

Sunday, September 26, 2010

A Day at Common Ground Fair

Common Ground Tees
 
The Common Ground Fair in Unity, Maine is put on annually by MOFGA, "Maine Organic Farmer's and Gardener's Association." It's a 2-1/2 hour drive for us, a ways off the highway, and into the countryside of mid-Maine. The drive for us is well worth it and we try to get there every year. Most of the topics we are interested in are represented: gardening, fiber arts, homesteading, livestock, timber harvesting (the low impact variety), and green technology. There is a farmer's market with organic produce, candles, chutneys, herbs. American Indian culture has a huge tent, and there are arts and crafts booths galore. Fedco Seeds always has an apple display of heirlooms grown in Maine, one of my favorite things to look at. The fair goes for three days but we make it a day trip and take in all we can. One day is not enough to take in a few lectures AND see all the exhibits, so we always save some stuff for next year. 

This year we attended talks on Permaculture, “Poop de Jour,” and Keeping Chickens. 


Permaculture lecture
Permaculture was an excellent lecture that covered lots of territory (as I blogged earlier, permaculture has lots of topics), and the speaker happened upon a topic we have been wondering about- how to terrace our orchard. We now have a better idea of how to create swales and pathways, and to introduce a herbaceous layer on this hillside area. We’ll blog our orchard activities as we get this project going.

“Poop de Jour” sold us once and for all time on human-ure. We’d been pondering that rather magnificent conglomeration of underground architecture commonly called a septic system, and coming up with a lot of reasons to not have one. We’ll be blogging our “green” house ideas as they materialize (a project that is a few years in front of us yet).

The lecture on chickens didn’t really apply to us so we left early. We’ve been putting our research more towards ducks anyway.


Here are some photo highlights of the fair:
A drumming circle

The political action tent

Plowing with horses


Timber framing demo

Tomato hoop tent, marigolds and chard
The fleece tent


Parade: "We all Live in the Garden"

We did our shopping on the way out buying cabbages for sauerkraut (we'll blog sauerkraut making next), a pair of stainless steel wine glasses (good for traveling), admiring many fabulous-looking cucurbit varieties (squashes and pumpkins), marveling at the twelve different varieties of garlic at one booth, and sampling some wonderful chutneys at another. And now we're looking forward to next year's fair... -jmm

Friday, September 24, 2010

Stevia

The stevia plant (Stevia rebaudiana) is native to the Southwestern U.S., Central and South Americas, and is related to sunflowers. Its usage originated in South America where it has been used as a sweetener for centuries. The Guarani natives of Paraguay call it “ka’a he’e”, or "sweet herb". 

Stevia is non-caloric and super sweet. It can be used either fresh or dried, with no loss of sweetness in the drying process. The leaves are said to about 30 - 40 times as sweet as sugar (commercial extracts of it can be as much as 300 times as sweet as sugar), although individual plants are said to very greatly in their sweetness. In the garden we try it for sweetness by plucking and eating a leaf.

According to the seed company, Johnny's Selected Seeds, stevia is a plaque retardant and tooth decay inhibitor. It also repels insects as its sweetness causes aphids, grasshoppers and other pests to avoid it. Be aware though, there are other invaders that may inhibit your crop. A friend of ours stopped growing stevia because her children would pick and eat all the young leaves, leaving nothing left to harvest. Garden pests come in all shapes and sizes.

Stevia has been an experimental crop for us. We were able to start a few plants from seed in the garden. Stevia is known for its iffy germination, so if you can find plants you might be better off.  Last fall I potted up one of the garden plants and brought it indoors for the winter- it is perennial to zone 9 but can be potted up and brought indoors in cooler climates. We used it sparingly and it kept on growing. This spring the pot was set outside and has been thriving all summer. The long stems twined themselves around our porch rail. I recently trimmed it back and dried the leaves. Stevia doesn't survive frost, although cool weather tends to enhance its sweetness. 
 
Stevia, being a sweetener, has many uses. I simply crumble some dried leaves into teas, sauces and any recipes calling for a little sweetness. Add stevia to tomato sauce to counter the acidity of the tomatoes. Add it to a cup of tea, use it to sweeten dressings and sauces. In larger quantities (you will have to experiment to find the desired amounts) it can be used in cookies, breads, and other baked goods. 

 Why isn't this amazing herb better known? The USDA, in conjunction with the sugar industry and makers of sugar alternatives saccharine and aspertame, has declared that stevia can only be legally sold in the U.S. as a "dietary supplement". It is perfectly legal, though, to grow stevia yourself. Although available in health food stores, growing stevia yourself is a great way to enjoy this alternative to sugar and other processed sweeteners.

Drop us a line or two in the comments here and let us know your experiences with it if you have tried it. -G.H.

Monday, September 20, 2010

Permaculture

Recently we attended a talk on the subject of permaculture. The speaker began by asking us what our concerns are regarding the world we live in. The words global warming, sustainability, pollution, population are a few of the words that popped up from around the room. Almost everyone contributed a word and each word seemed to evoke some kind of crisis.
She then began to explain what permaculture is. The word “permaculture” is a composite of the words “permanent agriculture.” Permanent agriculture may seem like an oxymoron- we are accustomed to the idea of food coming from huge fields that are tilled under and newly planted every spring, and plied with chemicals of many kinds. But those fields are a big reason why the idea of permaculture is an important one. It is an idea that addresses the issues we are concerned about- mainly sustainability and how we can better care for the environment. 
Permaculture is a way of using land that creates maximum productivity and sustainabliity at the same time. It consists of methods that work with the earth, not against it. It is organic in the best sense of the word. And, it goes beyond what we know of as agriculture by making use of methods that work with nature. What i find most captivating about it is that it gives us a way as individuals to actively help this planet to heal. Through these methods each one of us can create a healthy food-providing environment in our own yard.  
The methods apply equally to backyard gardening as they do to acreage. The speaker showed her plan for her 1/2 acre suburban yard. She had scoped out the various areas of the yard that differed from others. Some of these are self explanatory such as sun exposure, but others not so immediately evident such as a strong current of wind through the backyard requiring a windbreak, and a swampy area in one corner- good for plants that like wet feet. The heat from the house on the south side- good for strawberries and lots of other things. How the east side of the house always seemed like the perfect place for the family to gather. She explained how observation helps us learn what different areas of the yard will be good for.   
And this is just the beginning of the concept of permaculture. It also involves using native plants, creating guilds which are groupings consisting of a variety of plants, making maximum use of veggie garden space, swales and other means of capturing and using rain water, using plants to draw nutrients from the soil, creating habitat for beneficial insects and other helpful wildlife, and i guess you can see by now that permaculture is a broad concept with many sub-topics.          
This is an area of land use methods that we are currently researching and exploring. We’ll be blogging on various topics within this subject as we begin to explore them ourselves. -jmm

Monday, September 13, 2010

How to Build a Cold Frame

It is easy and inexpensive to build a cold frame. Certainly a good project for frugal people like us. Basically, a cold frame is a wooden frame with windows set on top. 
We’ve seen some pretty expensive versions of cold frames that have built-in irrigation systems and self-opening windows. Cold frames need a little watering here and there, but not enough to require an irrigation system, in our opinion. The enclosure helps to retain moisture, and so does the soil as long as it is high in organic matter (compost). As for opening the windows, my method is to prop them up with a little stick. The windows need to be raised when the sun is out and temperatures are above freezing otherwise it can get warm enough in there to bake the plants.

This cold frame is an extra-long version using three windows.


Windows are often free for the taking if you know someone who is replacing theirs. Or you might try the local dump, or check around the neighborhood on large-item pick-up day. Our windows happen to be 34” wide by 31” long, and we use two side by side, making our useable soil space about 68” wide by about 27”. A little note on the windows is that ours are double-pane, giving an extra bit of insulation. People who use single-pane windows sometimes need to throw a blanket over the frame on really cold nights. We have never needed to do this with ours. 
Here are some basic instructions to make a cold frame.
Go to the lumber yard for 2x12 and 2x8 boards. You will need one 2x12 the width of the two windows, 68” in our case. Get the 2x8 the same length. Then you will need two lengths of the 2x12 for the sides of the frame, for us this is about 29-1/2” - about 1-1/2" shorter than the length of the window to allow for some overlap so the window can be lifted. You can have them cut to size at the lumber yard but it is cheaper to saw them yourself. Use a good hand saw or a circular saw. 
Attach the sides onto the ends of the front and back pieces. Use corner braces to fasten them together. These make the frame more stable than simply screwing the lumber pieces together. The corner brace packets come with the screws needed to attach the front, back and sides of the cold frames.
Work on a flat surface so all the boards stay lined up. Use an electric drill to start holes for the screws, and a good old fashioned screwdriver unless you use the drill with a screwdriver bit. 
It's a good idea to check that the windows will fit nicely before putting in the final screws (there's likely to be some variation between your windows and ours in how they will fit onto the boards). When the cold frame is all put together, the windows rest on the back and front boards of the frame. They should fit snuggly side by side with a little overlap on the front so they can be lifted easily.
We have placed our cold frames over existing raised garden beds or set them up in new spots. When using a space that was not previously gardened, prepare the soil below it with loam, peat moss and plenty of compost. Ideally, prepare the spot a month or so ahead of planting and apply manure. Set up the cold frame with the 2x8 facing toward the south. Place it directly on top of prepared soil. Now you're ready to plant seeds that will grow your late fall, winter and early spring produce. -G.H. 

Tuesday, September 7, 2010

Cucumber Basil Salad

Serves 4
It seems we throw half the garden into our cuisine these days, and cucumber salad is no exception. Basil adds the perfect zest to this side dish.
We used pickling cucumbers in this but other types can be used as well. Picklers are multi-useful; good for both brined and canned pickles, and equally great for slicing raw into green salads, and of course for cucumber salad, and oh yes, cucumber sandwiches too!  
Be sure to serve bread alongside this salad - the olive oil and rice vinegar dressing is a great dip for the bread after the cucumbers are dished out.
1 large or 2 small cucumbers, thinly sliced
1 tbsp salt
1/2 medium onion, diced
4 cloves of garlic, minced
1/2 medium sweet green pepper, diced
4 Tbs finely chopped fresh basil
1/2 cup brown rice vinegar (apple cider vinegar may be used instead)
1/4 cup extra virgin olive oil
Ground white pepper to taste (or black pepper)
Place the sliced cucumbers into a bowl and sprinkle with the salt. Add cold water to cover the cucumbers. Let soak for 20 - 30 minutes. 
While the cucumbers are soaking combine oil, vinegar, onion, garlic, pepper, basil and ground white pepper in a bowl. Allow to stand for 15 minutes for the flavors of the herbs to infuse into the oil and vinegar. 
Rinse the cucumber slices in cold water to remove the salt. Mix the cucumbers into the oil and vinegar mixture. Let sit for 10 minutes, then serve. -G.H.

Monday, September 6, 2010

Winter Squash and Saving Seeds

Winter squash is a staple for us, so we were greatly disappointed last year when some of our squash crop did not match the catalog description. These resembled extra large zucchini with some of the coloring of Delicata. They had nothing to offer for flavor. The one thing they did very well however, was to last the winter flawlessly. They had grown a very hard shell which had to be chunked up with a shovel to make compost out of them (who can eat bland squash?)  
Butternut squash climbing the
pole with the pole beans

This year we changed our supplier and did our seed shopping in the *Fedco Seed catalog. This by the way is a great catalog to read on a snowy day in January when gardening is something you can only dream about. They give you plenty to read in this little book- great descriptions and many informative sidebar tidbits. 

Back on the subject of squash, according to the catalog there are six different species of them, with three of those commonly available to gardeners. Anyone who saves seeds needs to be aware of these different species. Squash seeds are very easy to dry and keep- and available in handfuls whenever you cut one open for cooking. 

Delicata squash on the stone wall

However, as Fedco explains, if you plant two varieties within one species, through the process of pollination they can mix with each other. This means you can get some weird looking “things” in your garden that you never expected. So, to save seeds it is important to grow only one of each species. And, even if you’ve taken care to plant only one of a species, squash grown by your neighbors as much as 1500’ feet away can share pollen with yours. Much to look out for! And, apparent from the strange crop we got last year, cross-pollination can even happen to a seed supplier.

Summer squash and pumpkins belong to these same species also. There is actually no such thing as a pumpkin, they are all squash. Here are the three species with some of the common varieties within them.

Curcurbita Pepo: Delicata, Spaghetti Squash, Acorn Squash, Jack-o-Lantern Pumpkin, Zucchini and other summer squash.
Curcurbita Maxima: Hubbard Squash, Buttercup Squash.
Curcurbita Moschata: Butternut Squash, Cheese Pumpkin.
Although seed saving may be risky in regards to next year’s crop, it doesn’t hurt to try it as long as you have the space to also buy seeds and plant your stand-bys. Who knows, you might even invent a new variety! And too, plant at least one variety each year that you haven’t grown before. There are plenty to pick from, and there’s exquiste eating to be had from many of them. -jmm

*Fedco Seeds, P.O. Box 520, Waterville ME 04903-0520 This catalog is full of great info and exquisitely drawn porttaits of plants.


Monday, August 23, 2010

A Plum Busy Weekend

The plums came ripe enough to pick on Friday of last week. 

One year I let the plums go what must have been a day too long because the crows somehow got wind of fresh fruit for the pickin’s. Hearing loud and raucus caws right outside I said, “uh-oh, sounds like trouble!” And there they were, picking a plum and letting it drop to the ground, and then another, and then another. I’m guessing they were planning on having a fine plum dinner after all the picking was done. Well I got out there fast with a big container and scarfed up the plums- and let me tell you I have been crow-wary ever since!

The best time to pick is when the fruit is still firm but on the edge of softening. For eating, a soft plum is sweetest. The firmer plum is a bit sour, but this is the perfect stage for canning, baking, and for any recipe. Once they get soft they are difficult to pit and cut into pieces.  


Our plums are the small dark purple “prune“ type of plums (they can be dried to make prunes), a common variety called “Stanley”. Good for canning, baked goods, drying, and jams.
Plums seem to come ripe all at once unlike other fruits making it a good idea to have some kind of plan for them. Favorite things for us are chutney and baked goods and salsa. 
In the following three posts are the recipes we used this year. -jmm

Plum Crisp or Plum Pie

Makes one crisp or one 9” pie
“Luscious” is the only word I can find to describe this. Other fruits tend to hold their own in a crisp or pie, but plums MELD with other ingredients. It’s magical. And sweet, oh, my, yes, swe-e-e-et (even without a ton of sugar). Perfect by itself or add a dollop of whipped cream, ice cream, or my favorite- sour cream or creme fraiche.  
This recipe makes either a pie or crisp. If making crisp to put into the freezer make it directly in a 9-1/2 x 7-1/2” (or 2-3/4 qt.) glass pan made for freezing (these come with a plastic tight-fitting lid). Other baking pans of similar size may be used to bake a crisp.   
For pie only:
One 9” whole wheat pie shell

Filling:
6 cups unpeeled Stanley or “prune” plums, pitted and quartered
Juice of 1/2 lemon
1/2 cup honey
(1/4 cup whole wheat flour- for pie only)
1/2 tsp cinnamon
1/4 tsp salt
Topping:
1/2 cup sugar
1/2 cup flour
1/4 tsp cinnamon
1/4 tsp nutmeg
1/4 cup cold butter
Preheat oven to 375 degrees. 
Make the filling: Place plums in a large bowl, and drizzle with the lemon juice. Add remaining filling ingredients and toss. (Note: flour is only needed for making pie).
Make the topping: Place the sugar, flour, cinnamon, and nutmeg into a medium size bowl. Mix with a fork. Cut in butter until the mixture resembles coarse crumbs. 
Place the filling mixture into a baking pan if making crisp, or into the prepared pie shell for pie. Sprinkle the topping over the pie or crisp.  
Bake crisp for 40 - 45 minutes or until lightly browned on top. Bake pie for 50 - 60 minutes until bubbly and golden brown. You may want to set a baking sheet under the pie. Plums can be very bubbly! -jmm 

Plum Chutney

Makes 7 pint jars

This chutney is wonderful served with lamb (a substitute for mint jelly), duck, or any roasted game bird, chicken, and roasts. And great with Asian foods such as egg rolls or tempura used in place of duck sauce. Good, too simply scooped up with toasted pieces of pita bread.
16 cups pitted unpeeled plums, chopped
Juice of 1 lemon
1 large apple, chopped fine
3 cups organic raw sugar
3 cups cider vinegar
1 cup chopped onion
2 cups raisins
2 tbsp mustard seeds
2 tbsp ground ginger
1 tsp salt
Combine all ingredients in a large stainless steel pot. Bring to a boil over high heat, stirring often. Reduce the heat until the mixture is simmering gently. Continue to stir frequently. Cook until the mixture loses its “watery” appearance, and begins to thicken, about 30 minutes to 1 hour. If you like your chutney thin, it should be jarred and canned at this point. Otherwise, to make a thicker chutney continue to gently simmer- it will reduce slightly- up to about 2 hours.
Follow canning instructions for a water bath or steam canner- sterilize jars, place screw bands and lids into simmering water and keep everything hot. 
Ladle hot chutney into jars leaving 1/2” headspace. Remove any air bubbles, wipe the rim. Place lid on jar and screw on screw band until finger tight. Place in canner, bring water to a boil and process for 15 minutes. Allow to rest in canner for 5 minutes, then remove. Leave undisturbed for 12 hours, then place in cool storage. -jmm 

Plum Salsa

Makes 4 cups
The flavors of salsa which come from mostly cilantro, lime and hot pepper add phenomenal zip to slightly tart plums. Pick plums that are still firm for this recipe. Fruity salsas go great with poultry dishes, refried beans, as a taco topping, or simply serve with corn chips. Enjoy this seasonal treat!


The cilantro, stevia, mint, and jalapeno peppers in this recipe all came directly from the garden, and I grabbed some red onion from storage, harvested last month. The only ingredient that didn't come from our garden was the lime. Citrus doesn't survive our Maine climate.
3 cups pitted, unpeeled plums, diced
1/2 cup fresh cilantro, minced
1/3 cup red onion, minced
1/4 cup fresh mint, minced
1 tbsp stevia*, minced or 2 tbsp organic sugar or honey
Juice of 1 lime
1 or 2 jalapeno peppers
Combine plums, cilantro, onion, mint and stevia in a large bowl and toss. Add the lime juice and toss to blend. Dice one of the jalepeno peppers. For a milder touch, remove the seeds and ribs. A tip for working with hot peppers is to wear rubber gloves. I generally don't, but this time I had a nick in my finger and I wished I had taken that advice (and don’t go to rub your eyes). Add the diced jalapeno and toss. Taste and decide whether another pepper fits your temperature tolerance. If you want a hotter salsa, dice and add an additional pepper and toss to blend. 
*Stevia is a natural sweetner. We use fresh leaves in season and dry it for winter use. Last year we grew a stevia plant in a pot and moved it indoors for the winter. -G.H.